
In summary:
- To eliminate harsh shadows and create an atmospheric living room, you must move beyond a single overhead light and combine distinct layers: ambient, task, and accent.
- Choose warm color temperatures (around 2700K-3000K) to foster a cozy, inviting feel and avoid the sterile effect of cool, blue-toned light.
- Incorporate dimmers on all layers, ensuring you use ‘dimmable’ labeled LED bulbs and compatible switches to gain full control over the mood and intensity of your space.
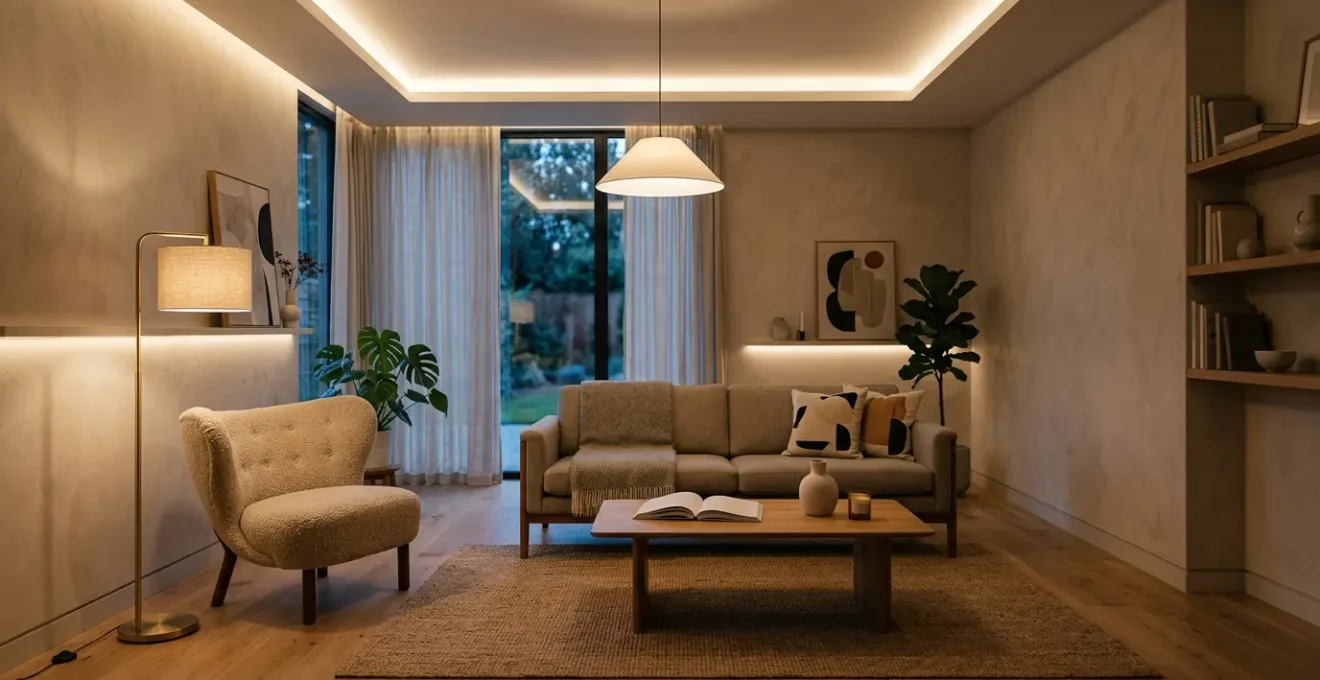
The lone ceiling fixture casts a flat, unforgiving glare across your living room, rendering every corner with harsh clarity and erasing all sense of depth. It’s a common problem for homeowners: a space that should feel like a sanctuary instead feels like a waiting room—cold, clinical, and devoid of personality. The conventional wisdom is to simply add a floor lamp in a corner, but this often just creates another isolated pool of light without solving the core issue. The reliance on a single, dominant light source is the root cause of this sterile atmosphere, creating stark shadows and a monotonous visual field.
But what if the solution wasn’t merely adding more lights, but intentionally sculpting with light? True lighting design treats light not as a simple utility, but as a tangible, aesthetic material used to shape perception, craft emotional resonance, and establish a clear visual hierarchy within a room. It’s a discipline that moves beyond illumination and into the realm of atmosphere. The secret lies in understanding that different types of light perform different jobs, and weaving them together creates a rich, dynamic, and comfortable environment. This isn’t about flooding a room with brightness; it’s about the deliberate interplay of light and shadow, or chiaroscuro, to build character.
This guide will deconstruct the principles used by lighting designers to transform spaces. We will explore the science behind why certain light feels “wrong” and provide a practical framework for layering ambient, task, and accent lighting. By mastering these techniques, you can move away from harsh, one-dimensional lighting and begin to paint with light, creating a living room that is not only functional but also deeply personal and atmospheric.
To guide you through this transformation, this article is structured to build your expertise layer by layer. Explore the topics below to understand each critical component of a well-lit space.
Summary: A Designer’s Blueprint for Layered Lighting
- Why 5000K Bulbs Make Your Living Room Feel Like a Hospital?
- How to Balance Ambient, Task, and Accent Lighting?
- Plug-in Sconces or Floor Lamps: Which Saves More Floor Space?
- The Mistake of Installing Non-Dimmable LEDs on a Dimmer Switch
- How to Position Bias Lighting Behind Your TV to Reduce Eye Strain?
- How to Position Your Bed for Maximum Psychological Security?
- How to Soundproof Your Apartment Against City Noise Without Renovating?
- How to Position Your Bed for Maximum Psychological Security?
Why 5000K Bulbs Make Your Living Room Feel Like a Hospital?
The feeling of a “hospital” or sterile office environment is directly linked to the color temperature of your light source, measured in Kelvin (K). Bulbs rated at 5000K or higher emit a cool, blue-white light that closely mimics the intense brightness of the midday sun. While this type of light is excellent for tasks requiring high focus and alertness, it has a profound and often negative psychological impact when used in a space designed for relaxation. It triggers a biological response in our brains that signals “daytime” and “work,” which is the antithesis of a restful living room atmosphere.
This is not just a feeling; it’s rooted in our biology. Cool, blue-enriched light is known to affect our circadian rhythms. In fact, research has shown that exposure to this type of light can result in a 17% increase in alertness and work performance, making it ideal for an office but disruptive for an evening environment. For a living room, where the goal is to wind down, you should aim for a much warmer color temperature, typically between 2700K and 3000K. This range produces a soft, yellowish glow reminiscent of a candle or fireplace, promoting relaxation and comfort.
The science on this is quite clear, as it directly relates to hormone production. As a research team from Harvard Medical School pointed out in a study on the subject:
Exposure to blue-enriched cool light in the evening can suppress melatonin production, making it harder to fall asleep.
– Harvard Medical School Research Team, Harvard health study on color temperature
Choosing a 5000K bulb for your primary living room light is, therefore, a fundamental mistake in crafting a chromatic narrative for your home. You are essentially telling your body it’s the middle of the day right when it should be preparing for rest. Shifting to warmer bulbs is the first and most impactful step in moving from a clinical to a cozy space.
How to Balance Ambient, Task, and Accent Lighting?
The core of sophisticated lighting design is the layering of three distinct types of light, each with a specific function. Moving beyond a single overhead source requires you to think like a designer, orchestrating these layers to create a cohesive and functional visual experience. The three layers are Ambient Lighting, Task Lighting, and Accent Lighting. Mastering their balance is what separates a beautifully lit room from a merely bright one.
This diagram visually separates the three layers, demonstrating how they work in harmony to build a rich, multi-dimensional environment. Each layer addresses a different need, from general visibility to focused activity and aesthetic highlights.
As you can see, the layers are not in competition; they are in conversation. Here’s how to think about each one:
- Ambient Lighting: This is your base layer, the general illumination that fills the room and allows you to navigate it safely. It’s the soft, diffuse glow from a ceiling fixture, recessed lights, or large lamps. As a technical baseline, many lighting professionals recommend around 20 lumens per square foot for general ambient lighting in a living room.
- Task Lighting: This is focused, functional light for specific activities like reading, working, or playing a board game. A reading lamp beside a chair, under-cabinet lighting in a kitchenette, or a desk lamp are classic examples. It should be bright enough to prevent eye strain but contained enough not to overwhelm the room.
- Accent Lighting: This is the dramatic layer. Its job is to create visual interest by highlighting architectural features, artwork, or decorative objects. Track lighting aimed at a painting, an uplight behind a plant, or a wash of light on a textured wall all serve as accent lighting. This layer creates depth, contrast, and a focal point for the eye.
A well-balanced room typically has all three layers controlled by separate switches or dimmers, allowing you to tailor the atmosphere to the occasion. For a lively gathering, you might have all layers on; for a quiet evening, you might only use a few task and accent lights to create an intimate, moody setting.
Plug-in Sconces or Floor Lamps: Which Saves More Floor Space?
When adding layers of light beyond a central fixture, the choice between floor lamps and plug-in sconces often comes down to a critical trade-off: floor space versus wall space, and flexibility versus permanence. While a floor lamp has a physical footprint on the ground, a plug-in sconce occupies vertical real estate on your wall. Deciding which “saves” more space depends entirely on your room’s layout and your long-term design goals.
Floor lamps are the champions of flexibility. Their primary advantage is that they require no installation and can be moved at a moment’s notice to accommodate new furniture arrangements or changing needs. This makes them ideal for renters or homeowners who enjoy frequently redecorating. However, their base and stand occupy valuable floor area, which can be a significant drawback in smaller living rooms where every square inch counts.
Plug-in sconces, on the other hand, are the ultimate space-savers on the floor. By mounting directly to the wall, they free up the ground completely, allowing for a cleaner, more open feel. They can be positioned perfectly over a side table or next to a sofa without taking up surface area, functioning as a powerful architectural element. The trade-off is their semi-permanent nature. While they don’t require an electrician like their hardwired cousins, they do require mounting hardware, and their placement is far less flexible than a floor lamp. Their dangling cords can also be a visual downside if not managed carefully.
Ultimately, the choice is strategic. If your floor space is at a premium and you’re confident in your layout, plug-in sconces offer a sleek, space-efficient solution that sculpts the vertical plane. If you value versatility and the freedom to adapt your lighting scheme on a whim, the footprint of a floor lamp is a small price to pay for its convenience.
The Mistake of Installing Non-Dimmable LEDs on a Dimmer Switch
One of the most common—and frustrating—mistakes in modern lighting is assuming any LED bulb will work with any dimmer switch. This seemingly small oversight can lead to a host of problems, including flickering, buzzing, and the premature death of your bulbs and even the switch itself. The issue isn’t a lack of power; it’s a fundamental incompatibility between the bulb’s internal driver and the dimmer’s technology.
This close-up of a modern LED bulb highlights the precision engineering involved. Unlike simple incandescent bulbs, LEDs contain complex electronic drivers that regulate power, and not all are designed to interpret the signals from a dimmer switch correctly.
When you connect a non-dimmable LED to a dimmer, the switch attempts to reduce the power by rapidly chopping the electrical waveform. The bulb’s driver, not designed for this fluctuating input, struggles to maintain a steady output, resulting in the characteristic flicker or strobe effect. The audible buzz is often the sound of internal components vibrating under this electrical stress. This not only creates an unpleasant environment but also drastically shortens the lifespan of the bulb. To avoid this common but costly mistake, a systematic check is essential.
Action Plan: Ensuring LED and Dimmer Compatibility
- Verify the Bulb: Check the packaging or the bulb itself. It must be explicitly labeled as “dimmable.” If it doesn’t say so, assume it is not.
- Confirm the Switch: Not all dimmers are created equal. Older models were designed for incandescent bulbs and may not work with the low power draw of LEDs. Check that your dimmer is rated for LED or is a universal “C.L” (CFL/LED) model.
- Standardize Your Circuit: Never mix different types of bulbs on the same-dimmed circuit. Using a mix of LEDs, incandescents, or CFLs can lead to unpredictable performance and damage.
- Match the Driver Type: For advanced setups, you must match the dimmer to the LED’s driver. The core issue lies in the driver technology; ensure compatibility between the dimmer (leading-edge or trailing-edge) and the bulb.
- Meet the Minimum Load: LEDs use very little power. Some dimmers have a minimum wattage requirement to function correctly. The combined wattage of the LEDs on the circuit must meet this minimum, or the lights may not turn on or will flicker.
How to Position Bias Lighting Behind Your TV to Reduce Eye Strain?
In a dark or dimly lit room, the intense brightness of a modern television screen creates a high contrast ratio with the wall behind it. Your eyes are constantly working to adjust between the brilliant screen and the dark surroundings, leading to fatigue, headaches, and general eye strain. Bias lighting is the elegant solution: a soft, indirect light source placed behind the TV that raises the ambient light level around the screen, thereby reducing the harsh contrast.
The implementation is simple. It typically involves applying an LED strip to the back perimeter of your television. However, for it to be effective without distorting the on-screen picture, positioning and color are critical. The goal is to create a gentle “halo” of light on the wall behind the TV, not a distracting beacon. The light should be diffuse and evenly distributed, not a series of bright spots.
For optimal performance, follow these professional guidelines:
- Placement: Mount the LED strip a few inches in from the edge on the back of the TV. This ensures the light washes out onto the wall smoothly rather than spilling around the sides of the screen.
- Color Temperature: This is non-negotiable for videophiles. The bias light should be calibrated to a neutral D65 white point (6500K). Any other color—warm yellow, cool blue, or especially novelty colors like red or green—will trick your brain into misperceiving the colors on the screen, ruining the director’s intended color grading.
- Intensity: The bias light should not be bright. A good rule of thumb is that its brightness should be approximately 10% of your television’s maximum brightness setting. It should be just bright enough to be noticeable when the screen is black, but not so bright that it becomes a secondary focal point.
When correctly positioned and calibrated, bias lighting doesn’t just reduce eye strain; it can also improve the perceived black levels of your screen. By providing a neutral reference point, your brain interprets the blacks on the screen as deeper and richer, enhancing the overall viewing experience.
How to Position Your Bed for Maximum Psychological Security?
The position of your bed within a room has a profound impact on your sense of safety and your ability to rest deeply. This isn’t superstition; it’s a principle rooted in our evolutionary wiring for survival. For millennia, humans have needed to feel secure from potential threats while sleeping. The ideal bed placement, often referred to as the command position in Feng Shui, directly addresses this primal need for subconscious security.
The command position is simple in principle: you should be able to see the door to the room from your bed, but not be directly in line with it. This placement provides a clear line of sight to the room’s main entrance, eliminating the anxiety of the unknown. You are subconsciously aware of anyone entering the space, which allows your nervous system to relax more fully. Being directly aligned with the door, however, can feel vulnerable and exposed, as if you are in the “path” of any incoming energy or threat.
To achieve this sense of psychological security, follow these two fundamental rules:
- Place the headboard against a solid wall. Having a solid structure behind your head provides a feeling of support and stability. Avoid placing your bed with the headboard floating in the middle of the room or against a window, as both can create a sense of vulnerability from behind.
- Ensure a clear, diagonal view of the door. Position the bed so that when you are lying down, you can see the door without having to crane your neck. This commanding view is the most critical element for reducing subconscious anxiety and promoting restful sleep.
By honoring these deep-seated psychological needs through strategic placement, you are creating a foundational layer of security. This allows for deeper, more restorative sleep, as your mind is not on low-level alert throughout the night. It is the first step in transforming your bedroom from just a room with a bed into a true personal sanctuary.
How to Soundproof Your Apartment Against City Noise Without Renovating?
Living in a vibrant city comes with an unavoidable soundtrack of traffic, sirens, and neighbors. While true soundproofing requires renovation, you can significantly reduce noise pollution and create a more tranquil indoor environment using techniques that focus on sound absorption and sound masking. These methods don’t eliminate sound, but they dramatically reduce its ability to bounce around your space and command your attention.
First, focus on absorption by adding soft, porous materials to your rooms. Hard surfaces like hardwood floors, bare walls, and large windows reflect sound waves, creating echo and amplifying noise. To counter this, introduce materials that trap sound:
- Soft Floor Coverings: A thick rug with a quality rug pad underneath can do wonders to absorb both airborne noise from outside and impact noise from the floor below.
- Heavy Drapery: Install heavy, thick curtains over your windows. Look for drapes marketed as “blackout” or “thermal,” as their density is excellent for dampening sound from the street.
- Textiles on Walls: Large fabric wall hangings or tapestries can absorb sound just like a rug. A more functional approach is to install large bookshelves against shared walls; a wall of books is an excellent and attractive sound diffuser and absorber.
Second, address the weak points where sound enters most easily: gaps around doors and windows. Use inexpensive weatherstripping to seal the perimeter of your apartment door and window frames. A door sweep installed at the bottom of your front door can significantly block hallway noise. These steps add mass and density to the most vulnerable entry points.
Finally, if intrusive sounds persist, employ sound masking. This involves introducing a constant, low-level ambient sound to mask the jarring, irregular noises from outside. A white noise machine is designed for this specific purpose, but a simple fan or an air purifier can be just as effective. This consistent “hiss” or “hum” makes sudden noises like a car horn or a slammed door far less likely to startle you, allowing your brain to tune them out.
Key Takeaways
- Light is a material to sculpt space, not just a utility; the goal is to create atmosphere and emotion through the interplay of light and shadow.
- The three-layer system (Ambient, Task, and Accent) is the non-negotiable foundation of good lighting design, with each layer serving a distinct and complementary purpose.
- Technical details are crucial: a warm color temperature (2700K-3000K) is essential for a relaxing mood, and ensuring LED bulbs are explicitly labeled ‘dimmable’ and paired with a compatible switch prevents flickering and damage.
How to Position Your Bed for Maximum Psychological Security?
Having established the foundational importance of the bed’s physical placement in the “command position,” the next step is to use light to reinforce that sense of sanctuary. The way you light the area around your bed is just as crucial as its location. A harsh overhead light in a bedroom can negate all the psychological comfort gained from proper bed placement, creating a clinical and exposed feeling right where you should feel most secure.
The goal is to create a soft, personal bubble of light around the bed. This is achieved by relying exclusively on low-level task and ambient lighting within the immediate vicinity of the bed, and keeping the general overhead light switched off as you prepare for sleep. This creates a clear demarcation between the “rest zone” and the rest of the world. Bedside table lamps or low-hanging pendants on either side of the bed are perfect for this. They provide sufficient light for reading while casting a warm, contained glow that doesn’t flood the entire room.
Using dimmers on these bedside lights gives you ultimate control over this personal sanctuary. You can dial the light down to a very low, gentle level, signaling to your brain that it is time to wind down. This soft, warm illumination enhances the feeling of being in a safe, protected cocoon, reinforcing the psychological security established by the bed’s command position. By layering your light correctly even in the bedroom, you complete the transformation from a simple sleeping space to a true restorative retreat.
Your living room is not just a space; it’s a canvas awaiting your personal touch. Begin today by looking at your room not for what it is, but for what it could be. Turn off the overhead glare, introduce a single new layer of warm, focused light, and watch as the shadows soften and a new atmosphere begins to emerge. This is the first step in sculpting a home that truly feels like your own.